Testing the Board with the Factory Image
Note
This page is retained for reference purposes. It is more useful to follow the Flashing the System Image instructions rather than use the software originally supplied with the development board.
You may find it useful to verify that the development board, as initially shipped, is functioning. The two methods described below can help to check that the serial and Ethernet connections to the board are working correctly. If neither of these procedures work for you, please get in touch.
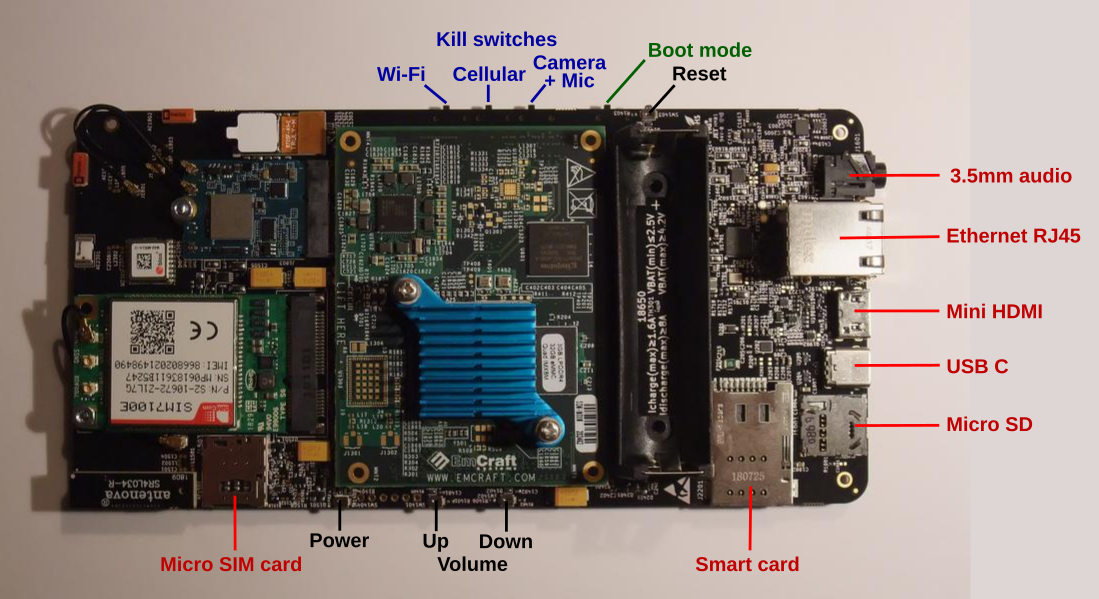
Before you begin: make sure that the Boot Mode switch is set to eMMC – see the labelled photo below.
USB Serial Console
Connect the board to a workstation using a USB-A to USB-C cable. The haptic motor will sound briefly and the board should appear shortly after as a USB serial device to the workstation.
Check to see that the following appears in the output of the lsusb command:
Bus 003 Device 025: ID 0525:a4a7 Netchip Technology, Inc. Linux-USB Serial Gadget (CDC ACM mode)
The bus and device numbers may differ from those shown.
The device will also appear in the /dev/ directory as a serial port, such as
/dev/ttyACM0, which you can use to access the board’s serial console if
you have permission to read and write to that device:
picocom -b 115200 /dev/ttyACM0
This should produce the output like this:
pureos-test login:
You may need to press Return to see the prompt.
You should be able to log in using purism as the user name and 123456
as the password.
Note: You may have trouble accessing the serial device if your user is not
a member of the dialout group on your workstation. For example, you may get
an error like this:
FATAL: cannot open /dev/ttyACM0: Permission denied
In this case, you can either add your user to the dialout group or, as a
workaround, run picocom using the sudo command.
Ethernet Connection
Connect the board to a network using the Ethernet socket and a suitable cable. Connect the board to the provided power supply using the provided cable. Two green LEDs will immediately light up between the SoM and the battery holder. After a moment, the orange Ethernet light should start blinking and the haptic motor will sound briefly. The board should be accessible over the network via SSH.
The image shipped with the boards will claim the IP address 192.168.42.202 with the /24 netmask. Later images will try to obtain an IP address using DHCP – see below for information.
It should be possible to log in using purism as the user name and
123456 as the password:
$ ssh purism@192.168.42.202
If you update the image on the development board, it will try to obtain an IP address using DHCP. You will need to determine this address by accessing the DHCP client table for your local network. For example, if the board has been assigned the IP address 192.168.1.110 you can log in with the following command:
$ ssh purism@192.168.1.110
If you have difficulty determining the IP address of the board in the case where it uses DHCP, please contact your local network administrator for assistance.